Git Next - Using Git Aliases for Presentations
I recently presented at Sugcon EU 2019 (more on that in a soon to be written blog post). I’ve previously presented or taken part in presenting workshops and talks, but this was the first time that I knew I would be limited in time to deliver everything I wanted to cover.
The talk covered some features built by me and my team at Sitecore, so there were some fundamental pieces of code I wanted to demonstrate. Furthermore, I wanted to show the progress of the code as decisions were made. While setting up the code samples it became clear that I needed a quick way to ‘reset’ my working directory, while also quickly bringing in source code changes and ensuring things were in a good state to build/test/debug. Of course, I would also like code samples to be easily handed over to external developers as soon as possible after the presentation.
This gave me a few requirements:
- Code should be in a repo - Git was the obvious choice here.
- I should be able to reset the repo - So I can always begin from a clean state
- I should be able to progress to the next ‘step’ quickly
- Each step should be cleaned of any previous changes - If I go off-piste and modify the code, moving forward puts me in a clean state
- If possible, I should be able to get notes when moving to the next step
The final requirement came about after practicing the talk. To easily switch between the slide deck and Visual Studio meant I wouldn’t be able to see speaker notes.
A quick detour on git aliases
Git aliases are awesome. Seriously. Aliases are a very simple feature that enables anyone to become a power user. Or at least, simplify their life :-)
An alias is exactly as it sounds, an alternative string to execute a command. The main advantage is lengthy commands can become trivial; complicated arguments don’t need to be entered each time.
E.g. running git config alias.co checkout in a repo will create the
co alias. Now running git co will do a checkout (okay, not a lengthy
command, but you get the gist).
Aliases are persisted in the .git\config file:
[alias]
	co = checkout
You can also persist aliases globally by passing the
--globalflag in the command:git config --global alias.co checkout. They will then be persisted in your global config under your user folder. e.g.~/<username>/.gitconfig
Advanced aliases are where things get really interesting. They allow you to write arbitrary bash scripts which can do anything you want. You can also call out to other shells or executables as needed (but consider the OS and environment you’re running on). You can even pass arguments to your alias.
Implementing Git Next
With some basic understanding of git, and the flexibility of aliases, I was then able to consider an approach to the requirements.
- Code should be in a repo - Put code in git.
- Ability to reset -
git resetis the key - Ability to progress to ‘next step’ quickly - Numerical tags make this trivial
- Each step should be cleaned -
git cleanis key here to remove files - Ability to get notes when moving to the next step - Annotated tags!
Annotated tags are the real star
Using tags allows the repo to be set up and the demonstration path to be decided separately. Tags can be specified anywhere in the repo, allowing progress to jump across branches or even jump backwards in time. By naming the tags in a simple sequence, we can easily identify the next tag based on the current tags name.
Annotated tags allow the fifth requirement to be delivered. By annotating tags with some helpful comments we’re able to give notes during the demo, if needed.
The setup
I created my git repo and began work on the demo. As I completed key features I tagged them so that I knew it was a point to highlight. Once I had completed the code I tidied things up so there were fewer commits, but this wasn’t really necessary.
Each point that I wanted to highlight was tagged with an annotated tag where each tag was named sequentially from ‘1’:
PS> git tag 1 -m "This is a note"
PS> git tag 2 -m "This is a multiline note`n*Line endings will vary`n*depending on your shell"
...
The aliases
I edited the .git\config and added the following:
The commands can be broken down as follows:
git start- Receives an optional number (the tag to select). If no number is provided ‘1’ is selected by default. The repo is reset to that tag, additional files are cleaned and then the tag message is displayedgit next- Gets the current tag, increments by 1, then callsgit startgit prev- Gets the current tag, decrements by 1, then callsgit start
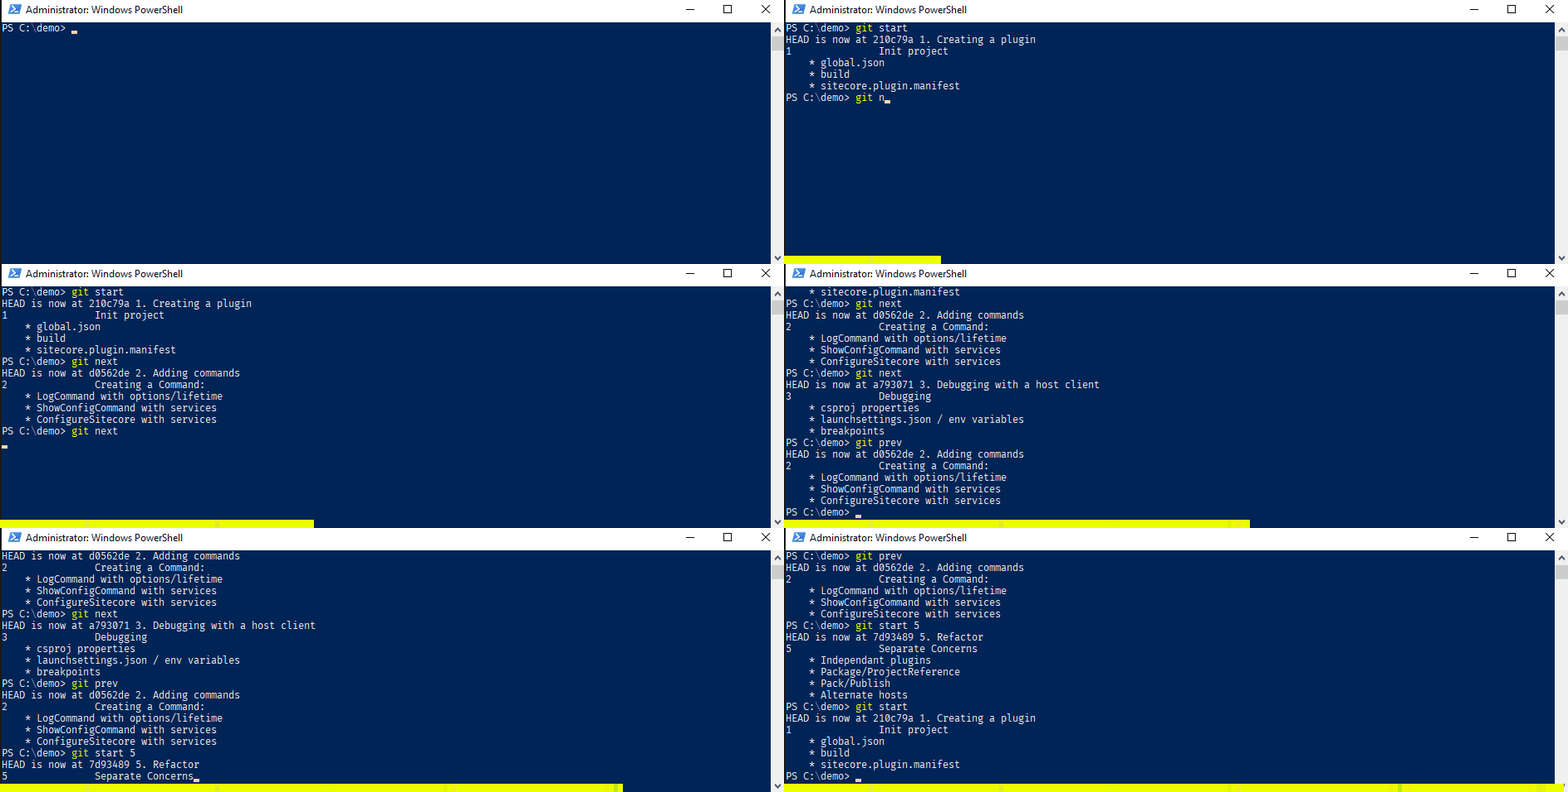
The aliases can then be used as follows:
# Start at the beginning of the demo
PS> git start
# Move to the next step
PS> git next
# Move to the previous step
PS> git prev
# Move to an arbitrary step
PS> git start <int>
As you can see from the gif, I was now able to move around my repo with ease, getting notes where needed and be confident that each step gave me a clean base to work from. Things even worked happily with Visual Studio, where changes to the csproj were picked up and loaded without causing issues.
I’ll definitely be using this in demos moving forward.

Leave a Comment
Your email address will not be published. Required fields are marked *